

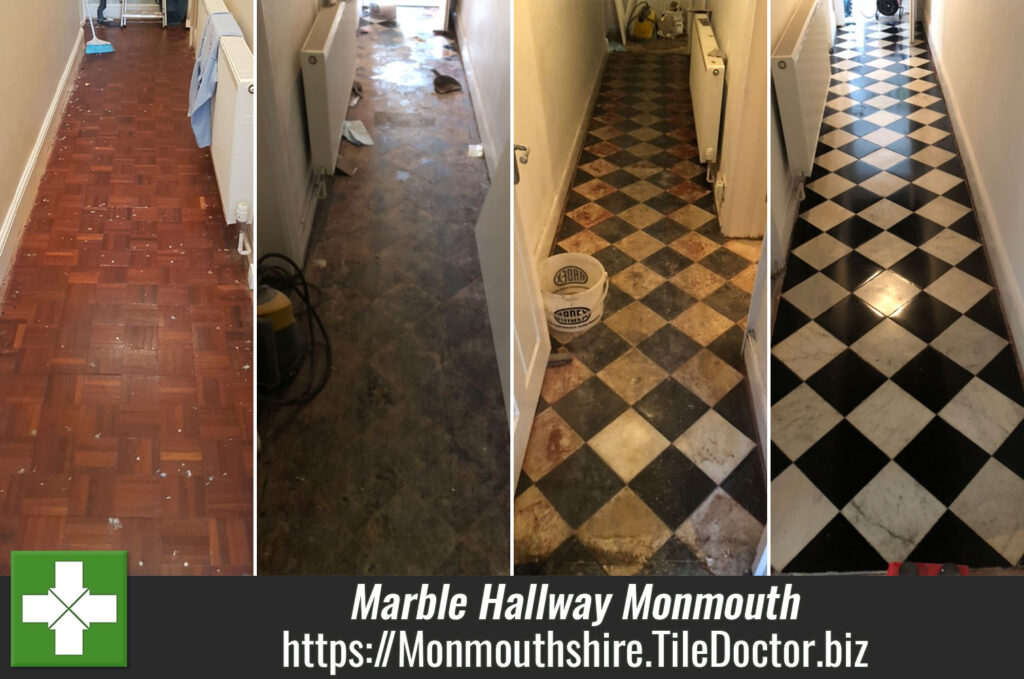
Marble Tiles Hidden under Parquet Flooring Restored in Monmouth
We discovered these Black and White Marble tiles under Parquet flooring at an 1890’s mansion house near Monmouth. The property had been converted into flats in the 1980’s and originally there was polished black and white marble throughout the entire ground floor however over the years, maintenance had been carried out resulting in parts of the floor having to be ripped up and filled with concrete.
Our customer had recently purchased the flat on the ground floor and were hoping to move in within the next couple months following renovation work. We were asked to remove the wooden parquet, restore the Marble floor, and lay 50sq m of tiles in their dining area.
During our survey we noticed there were several small areas in the bedroom where the Marble tiles had been taken up and backfilled with concrete so after discussing this with the owner, we agreed to replace this floor with matching Black and White Marble tiles from a reclamation yard.
 |
 |
With the scope of the work and our quote agreed a date was set for the work to begin and in the meantime, we started looking for Marble tiles in local reclamation yards.
Restoring Parquet Covered Marble Flooring
The first job was to prepare all the floors for cleaning which in this case involved completing the removal of the Parquet flooring and concrete backfill that had been used in some areas. This was a large enough job on its own but the most difficult part was to clean all the bitumen and adhesive that had been used to secure it in place.
The main challenger we faced on these two floors were breaking up and removing the areas where concrete had been filled in without disturbing neighbouring tiles as they are expensive to replace. With the floor clear of rubble, the replacement matching Marble tiles were laid to the original pattern and grouted in.

The bitumen adhesive issue was tackled initially using a dry scrape of the tiles to remove as much of the gluey substance as possible. Once done there was a vast improvement on our visibility of the tiles and condition of the floor and this revealed that every White tile in the hallway had been painted Red at some point in its long history. We hadn’t anticipated this problem however our next step was to further clean up the tiles using Tile Doctor Remove and Go which is a coatings remover and should help.
The Remove and Go was applied neat for maximum impact and left to soak in for ten to twenty minutes before being scrubbed in. The dwell time gives the product time to breakdown the coatings, softening them and thereby making them easier to remove. The method worked and we were able to scrape off all the glue and red paint which it turned out had been applied to the whole floor and not just the White tiles.

Once done both Marble floors were inspected and it was clear they were still substantially soiled with dirt and further cleaning would be required. To this a strong dilution of Tile Doctor Pro-Clean was applied to both floors, left to soak in as before and then scrubbed with a course deck brush to release the dirt. The soiling was then removed using a wet vacuum and the floor given a further inspection. This removed 95% of the dirt but we were not 100% satisfied so the whole process was repeated.
 |
 |
Polishing Restored Marble Tiled Flooring
Our final step in restoring the appearance of the original Marble tiles was to restore the polished appearance of the stone using a series of burnishing pads of different grits. This process began with a very coarse 100 grit pad which really cuts into the stone removing a thin layer of stone from the surface.
This 100-grit pad was followed by 200, 400, 800 and 1500-grit burnishing pads, water is used to provide lubrication and the floor is rinsed and soiling extracted using the wet vacuum after each pad. This process slowly rebuilds the appearance and polish on the Marble. The polishing process is finished the application of a very fine 3000-grit burnishing pad which is applied dry with only a little water sprayed onto the Marble tile.
Sealing a Marble Tiled Entrance Hall Floor
We Left the floor for 24 hours to fully dry out and returned on the last day to protect the Marble with a sealer. The customer specified they wanted a durable satin, wet look finish but so we suggested using Tile Doctor Seal and Go.
 |
 |
This product is a water-based sealer that gives the desired effect and make it easy to keep clean, additionally being water based it doesn’t leave a smell as it dries. Several coats were applied and once done the customer was thrilled.
For aftercare cleaning I recommended they use Stone Soap as its designed for the regular cleaning of sealed and polished stone, as well as cleaning it also helps build the patina.
Professional Restoration of a Mable Tiled Hallway in Monmouthshire
Marble Tiles Hidden under Parquet Flooring Restored in Monmouth Read More »


