grout cleaning

Slate Tiled Kitchen Floor Renovation Trellech Wye Valley

Slate Tiled Kitchen floor Trellech Wye Valley

Late last year I visited a property in the village of Trellech, situated in the Wye Valley to look at renovating a Slate tiled kitchen floor. This is always a busy time of year for Tile Doctors as understandably people want their floors looking at their best in time for the festive season.

Slate Tiled Kitchen Floor Test Clean Trellech Wye Valley

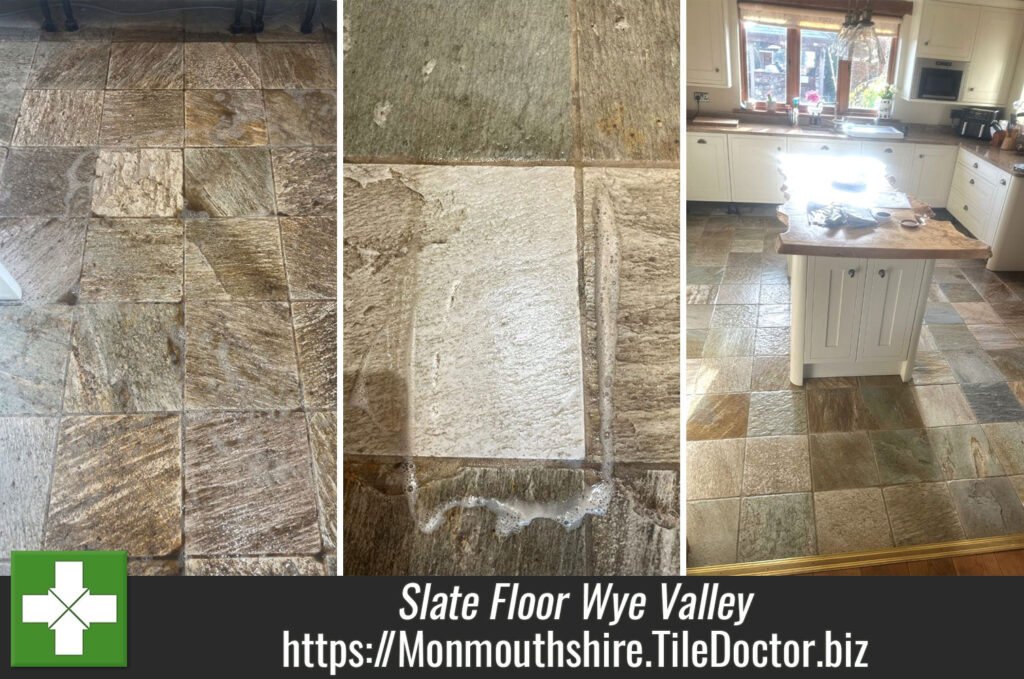
The Slate floor was comprised of twelve-inch square tiles which I could see were in a poor state, the sealer had obviously failed and without its protection dirt had become deeply ingrained into the Slate and Grout. To prove my point, I carried out a small test clean on part of the floor to demonstrate how clean we could get the floor. The difference was very clear and delighted with the potential results they asked me for a price to renovate the whole floor.

Slate Tiled Kitchen Floor Test Clean Trellech Wye Valley

I worked out a quote to deep clean the floor and then seal it which would bring back the natural beauty and colours of the stone whilst adding protection. They were happy to give me the go ahead and fortunately I was able to find a couple of days to do the work before Christmas holidays.

Cleaning a Slate Tiled Kitchen Floor

To begin the cleaning process, I applied a strong dilution of Tile Doctor Pro-Clean to the Slate tile and grout and left it to soak in for ten to twenty minutes. This dwell time is important as it gives the product time to break down the dirt and any old sealers still present on the floor.

The floor was then scrubbed using a coarse 240-grit Carbide Brush fitted to a rotary floor buffer to get the tiles as clean as possible. The pad can struggle to reach into the recesses of the grout lines, so I followed this up by scrubbing the grout with a stiff wire brush and more Pro-Clean. The floor was then rinsed with water, and the now soiled cleaning solution removed with a wet vacuum.

Once done, the floor was inspected and then any areas that required more work were hand scrubbed until I was satisfied the floor was as clean as it could be. After another rinse with water the floor was dried as much as possible with the wet vacuum.

Sealing a Slate Tiled Kitchen Floor

Applying a sealer to damp tiles can result in a patchy appearance so the floor was left to dry for 24 hours before I returned to apply the sealer. We had discussed sealers at our first meeting where I had gone through the different products and finishes available. From this the client requested a satin like finish so Tile Doctor Seal and Go was selected.

Once I had confirmed the floor was dry with a damp meter, I set about applying the first of what would be four coats of Seal and Go. This product is water-based sealer so it doesn’t give off an odour as it dries, it also brings out the colour in the stone and leaves a lovely subtle satin finish.

Slate Tiled Kitchen Floor After Renovation Trellech Wye Valley

The clients were extremely happy with the result and before leaving I took time to discuss aftercare. Essentially this means looking after the sealer and preventing its accelerated break down with the use of strong cleaning products. For a floor like this I like to leave clients with a bottle of Tile Doctors pH Neutral Tile Cleaner which is mild enough for daily use and has a pleasant fragrance, regular use should keep the floor in great condition.

Slate Tiled Kitchen Floor After Renovation Trellech Wye Valley


Professional Restoration of a Slate Tiled Kitchen in Monmouthshire

Slate Tiled Kitchen floor Trellech Wye Valley Read More »

Travertine Tiled Bathroom Floor Renovation Magor Newport

Renovating Travertine Bathroom Floor Tiles in Magor Newport

These travertine tiles were laid twelve years ago in the bathroom of a property in the village of Magor near Newport. They were supplied by Mandarin Stone however the tiler had not sealed or grouted them correctly during installation.

Travertine Tiled Bathroom Before Renovation Magor Newport

The client highlighted a significant crack running along 4 of the tiles starting at the bottom of the toilet and was unsure what to do about it. I suspect this was due to movement in the floor and wondered if a backer board had been used under the floor as this would usually prevent this.

The patterns you find in natural stone are unique so finding a replacement Travertine tile to match the cracked tiles was unlikely. I therefore suggested disguising the crack with a coloured filler as part of an overall renovation. They also asked me if I could regrout the entire floor as most grout lines were quite deep and below the surface edge of the tile, also the natural pits in the stone were collecting a large amount of dirt from foot traffic.

Travertine Tiled Bathroom Before Renovation Magor Newport Travertine Tiled Bathroom Before Renovation Magor Newport

Happy to oblige I worked out a quote to resolve all the problems which was accepted, and a date set to do the work.

Cleaning a Travertine Tiled Bathroom

I began by removing as much of the existing grout as possible with a grout rake, this is slow work as you must be very careful not to chip the adjacent tiles in the process. Once complete I started on cleaning the tiles using a medium dilution of Tile Doctor Pro-Clean which was left to soak in for 15 minutes. This dwell time gives the product chance to breakdown the dirt and other contaminates before being scrubbed into each tile using a handheld brush making sure every nook and cranny was sufficiently clean. The floor was then rinsed with a sponge and brush ensuring there was no product residue left within the tiles or pits.

Once the tiles had fully dried the floor was grouted using flexible grout in a colour that closely matched the grout used on the wall tiles. Grout was also run along the crack to disguise it as much as possible. Once the entire floor had been regrouted properly, I left to allow it to go off overnight and allow the tiles to dry out further.

Sealing a Travertine Tiled Bathroom

Previously I had discussed the range of Tile Doctor sealing products with the client and what they would provide in terms of finish. It was clear they wanted to keep the look of the stone as light as possible whilst sealing so with this in mind I opted to seal the Travertine with Ultra-Seal which is a clear coat sealer that provides maximum protection without enhancing or darkening the stone.

Four coats of Ultra-Seal were applied making sure to cover all pits in the tiles and the new grout that had been installed. This sealer works by occupying the natural pores in the stone, ensuring dirt remains on the surface where it can be easily cleaned away.

Travertine Tiled Bathroom After Renovation Magor Newport

Once complete I’m happy to report my client was really pleased with the result, they were worried that whole floor would have to be ripped out and replaced so much relieved to have found a better solution. I guess we really lived up to our Tile Doctor name on this occasion.

On the subject of aftercare, I left the client with a bottle of Tile Dr PH Neutral Tile Cleaner which is a gentle yet effective tile and grout cleaner that won’t harm the new sealer.


Professional Renovation of a Travertine Tiled Bathroom in Monmouthshire

Renovating Travertine Bathroom Floor Tiles in Magor Newport Read More »

Farmhouse Terracotta Tiled Floor Before After Clean Seal Symonds Yat

Terracotta Farmhouse Floor Renovated at Symonds Yat Holiday Home

The pictures below are of a Terracotta tiled floor that was laid in a Farmhouse in Symonds Yat around twenty years ago when the house was being renovated. The Terracotta tiles had been installed throughout the kitchen, utility and downstairs cloakroom and were well overdue a deep clean and seal.

Symonds Yat is a beautiful location amidst the fields of Wye Valley and set on the famous River Wye and is very popular with tourists. The farmhouse has been rented out as a holiday home for some time and with the floor looking faded and dull it was not giving the best impressions with visitors which is not good when you are using the property as a business.

Terracotta Tiled Floor Before Cleaning Symonds Yat Holiday Home

I visited the property to survey the floor as the picture’s customers send you never show up all the problems. I could immediately see the tiles were indeed in need of some tender love and care, the old sealer had long since eroded away and now the Terracotta was susceptible to dirt becoming ingrained. I carried out a test clean on a small area so they could see what the result might look like. They were over the moon with the test area and amazed that how much it would bring the floor back to life. I quoted them a price which they were happy to accept, and we booked the job in for later in the month.

Cleaning/Repairing a Terracotta Tiled Farmhouse Floor

To put the life back into the floor it needed to be stripped of any remaining sealer, cleaned and then resealed. I began this process by spraying the floor with a medium dilution of
Tile Doctor Remove and Go and left it to soak into the tile and grout for ten minutes. This product is designed to strip off old sealers from tile which is important as you will find the sealer will be completely worn off in the busier parts of the floor but will still be present around the edges etc. If you don’t strip off the sealer and apply a new sealer on top you will find the result becomes inconsistent and leaves a patchy finish.

After ten minutes the Remove and Go was scrubbed into the Terracotta using a rotary floor machine fitted with a black scrubbing pad. This action removed what was left of the old sealer and after rinsing and extracting I was able to move onto the cleaning process.

This process was repeated using Tile Doctor Pro-Clean which is tile and grout cleaning product that will remove ingrained dirt. As before the product was diluted, applied to the floor and after leaving it to dwell for a short while it was scrubbed in as before. Some of the grout and corners had to be done by hand as the rotary machine can struggle to reach in places. After rinsing off with water and extracting with a wet vacuum there were a few stubborn areas that required a repeat treatment, but we soon had the floor looking clean.

Terracotta Tiled Floor After Cleaning Symonds Yat Holiday Home

Sealing a Terracotta Tiled Farmhouse Floor

After leaving the tile and grout to dry off overnight I came back the next day and checked the floor was dry with the moisture meter. The readings were fine, so I began applying the sealer. I started with a single coat of Tile Doctor Colour Grow which is a colour enhancing product that seeps into the pores of the Terracotta protecting it from within. This was followed with seven coats of Tile Doctor Seal and Go. Terracotta is very porous and does take a lot of sealer.

Terracotta Tiled Floor After Cleaning and Sealing Symonds Yat Holiday Home

Once the sealer had dried the floor had a lovely satin finish that wasn’t too shiny. The client was over the moon with the restored floor and was keen for his next clients to see it.


Professional Restoration of a Terracotta Tiled Farmhouse Floor in Monmouthshire

Terracotta Farmhouse Floor Renovated at Symonds Yat Holiday Home Read More »

Dull Black Slate Tiles Before After Renovation Blackwood

Large Format Slate Kitchen Floor Tiles Renovated in Blackwood

A client of ours recently moved into a relatively new property in the town of Blackwood where the black slate floor looked dull and the grout was stained. Large format slate tiles were installed though the kitchen and adjacent dining and utility room and they were keen to see if the floor could be brought back to life.

Dull Slate Kitchen Floor Tiles Before Renovation in Blackwood

I went over to survey the floor and could see that the old sealer was failing and letting dirt into the pores of the stone which was especially notable in the busier parts of the floor which had seen the most foot traffic. The solution would be to strip the floor of the old sealer, clean up the grout and reseal. I conducted a number of test cleans to work out the best way to how best to strip off the old seal and get back down to the natural stone. However, as it turns out removing the old sealer was proving to be quite a job and I was concerned that this task alone could potentially take days.

Unhappy with the way things were going I consulted the Tile Doctor help line and we deduced that the sealer applied previously was most likely a heavy duty/industrial product. My client had only just moved into the property and didn’t know the history of the floor so couldn’t help pin point what was used before. The way forward was to strip the old sealer off the floor using abrasive pads.

Now I had an efficient strategy for renovating the floor I was able to provide the customer with an accurate quote which was accepted, and we agreed a date to return and complete the floor.

Cleaning a Dull Slate Tiled Floor

To begin the restoration, I pre-wet the floor with water and using a weighted floor buffer ran a coarse 100-grit milling pad several times across each tile. This process strips the dirt and sealer off the stone slowly turning the water into a grey slurry. Once the whole floor had been treated in this way, I rinsed the slurry off the floor and extracted it using a wet vacuum. The next step was to repeat the process using a 200-grit burnishing pad which being finer closes the pores in the stone and refines the surface further.

The next step was to clean up the grout using Tile Doctor Pro-Clean which is a strong alkaline cleaner. You apply a strong dilution to the grout lines and then scrub it in with a stiff brush. Fortunately, the slate tiles were large format size so there was less grout to deal with than usual. Once that was done the tile and of course grout was rinsed again with more water and then dried again using the wet vacuum.

Dull Slate Kitchen Floor Tiles During Renovation in Blackwood

I have to admit the stripped slate looked pretty awful at this stage in the restoration, but we were now back to the natural stone which was clean and free of all sealers. I left the floor to dry off fully overnight confident in the knowledge that with the application of a fresh sealer it would look a lot different.

Sealing a Slate Tiled Floor

The next day I returned to the property to seal the floor. Before doing so, however, I needed to test the Slate for moisture as you shouldn’t apply a sealer to a damp floor. The results were fine, so I proceeded to apply the sealer which for this installation I used several coats of Tile Doctor Seal and Go.

I chose Seal and Go for this floor as it works well on Slate resulting in a deep durable satin finish that the customer wanted. Additionally, being a water-based product, it doesn’t leave a smell as it dries.

Dull Slate Kitchen Floor Tiles After Renovation in Blackwood

Within two days the floor was transformed, the grout looked much cleaner and the stone looked new. My client was very happy with the work and left the following message on the Tile Doctor feedback system.

Professional, polite and courteous. Paul went beyond the call of duty to help rejuvenate our slate tiled kitchen and utility room floor. He explained each step of the job and provided advice on aftercare and future maintenance. The results are great and I would gladly recommend the services available.
Andy E, Blackwood


Renovation of a Dull Slate Tiled Kitchen Floor in Monmouthshire

Large Format Slate Kitchen Floor Tiles Renovated in Blackwood Read More »

Scroll to Top